<?xml version="1.0" encoding="utf-8"?><feed xmlns="http://www.w3.org/2005/Atom" ><generator uri="https://jekyllrb.com/" version="4.3.4">Jekyll</generator><link href="/feed.xml" rel="self" type="application/atom+xml" /><link href="/" rel="alternate" type="text/html" /><updated>2026-01-01T18:26:40+00:00</updated><id>/feed.xml</id><title type="html">Doug Bryant</title><subtitle>Doug Bryant - Senior Software Engineer Ruby,Rails,RabbitMQ,RabbitMQ,AMQP,Postgresql,MongoDB,Javascript,Python,Pandas,AWS,Redshift,DevOps,SOA,Distributed-Systems</subtitle><author><name>Doug Bryant</name><email>doug@netinlet.com</email></author><entry><title type="html">Setting up a MongoDB replicaset with AWS OpsWorks</title><link href="/2014/01/18/setting-up-a-mongodb-replicaset-with-aws-opsworks.html" rel="alternate" type="text/html" title="Setting up a MongoDB replicaset with AWS OpsWorks" /><published>2014-01-18T22:59:09+00:00</published><updated>2014-01-18T22:59:09+00:00</updated><id>/2014/01/18/setting-up-a-mongodb-replicaset-with-aws-opsworks</id><content type="html" xml:base="/2014/01/18/setting-up-a-mongodb-replicaset-with-aws-opsworks.html"><![CDATA[<p>I was recently tasked with setting up a <a href="http://docs.mongodb.org/manual/replication/">MongoDB Replicaset</a>.</p>

<p>Documentation for setting up a MongoDB Replicaset with OpsWorks was a bit on the sparse side and
took a bit of trial and error. I ended up with this solution.</p>

<!-- more -->

<h2 id="the-chef-recipe">The Chef Recipe</h2>

<p>The chef recipe used for this post is
https://github.com/netinlet/chef-mongodb_replicaset</p>

<p>OpsWorks allows you to use custom recipes. All dependent recipes should
be included in the custom cookbook.</p>

<p>The <code class="language-plaintext highlighter-rouge">mongodb</code> recipe depends on <code class="language-plaintext highlighter-rouge">apt</code>, <code class="language-plaintext highlighter-rouge">python</code>, <code class="language-plaintext highlighter-rouge">runit</code> and <code class="language-plaintext highlighter-rouge">yum</code> recipes.
Several recipes require the <code class="language-plaintext highlighter-rouge">build-essentials</code> recipes and the <code class="language-plaintext highlighter-rouge">runit</code>
recipe depends upon <code class="language-plaintext highlighter-rouge">yum-epl</code>.</p>

<p>The dependencies for this cookbook were pulled from the OpsCode public
cookbooks.  https://github.com/opscode-cookbooks</p>

<p>The <code class="language-plaintext highlighter-rouge">mongodb</code> recipe is custom.  I ended up using this <a href="https://s3.amazonaws.com/my-custom-cookbooks/java-mongodb-example-cookbook.tar.gz">recipe</a>
referenced in the presenation <a href="http://www.slideshare.net/AmazonWebServices/aws-opsworks-under-the-hood-dmg304-aws-reinvent-2013">AWS OpsWorks under the hood</a>.</p>

<p>The custom recipe is based off of https://github.com/edelight/chef-mongodb with OpsWorks <a href="https://github.com/netinlet/chef-mongodb_replicaset/blob/master/mongodb/recipes/opsworks_replicaset.rb">specific</a> <a href="https://github.com/netinlet/chef-mongodb_replicaset/blob/master/mongodb/libraries/opsworks_helper.rb">code</a> to properly setup replicasets in AWS OpsWorks.</p>

<h2 id="opsworks-setup">OpsWorks Setup</h2>

<p>I’m going to assume some degree of familiarity with OpsWorks.  If you
are new to AWS OpsWorks, you can get an overview here:
http://aws.amazon.com/opsworks/</p>

<h3 id="add-a-mongodb-layer-to-your-stack">Add a MongoDB layer to your stack</h3>

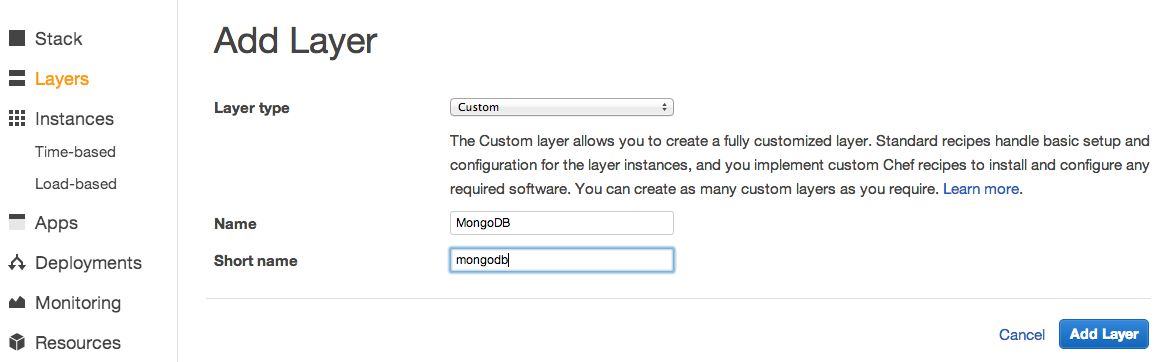
<p>Create a “Custom” layer named MongoDB and add it to the stack.</p>

<p><img src="/images/blog/opsworks-create-layer.png" /></p>

<h3 id="configure-the-mongodb-layer">Configure the MongoDB layer</h3>

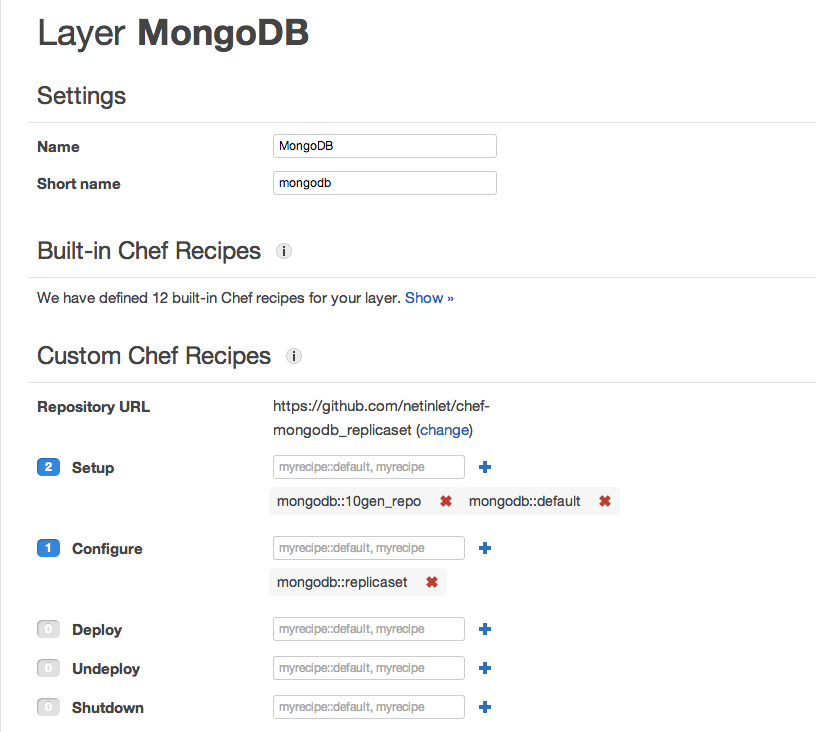
<p>A custom layer is pre-defined with 12 built-in recipes. Nothing to do or
change here.</p>

<h4 id="custom-chef-recipe-section">Custom Chef Recipe Section</h4>
<p><strong><em>Repository URL</em></strong>  Set the repository URL to the location of your chef recipe. This
repository can be a link to a Git or Subversion repository or an http or
S3 url. The custom recipe is configured in the Stack settings in which
your layer lives. In this case, I have it pointed to my <a href="https://github.com/netinlet/chef-mongodb_replicaset">Github chef
recipe</a>.</p>

<p>OpsWorks has 5 lifecycle events which can be used to execute Chef recipe
steps. These events are <code class="language-plaintext highlighter-rouge">setup</code>, <code class="language-plaintext highlighter-rouge">configure</code>, <code class="language-plaintext highlighter-rouge">deploy</code>,
<code class="language-plaintext highlighter-rouge">undeploy</code> and <code class="language-plaintext highlighter-rouge">shutdown</code>.  For this recipe, we will use the
setup and configure events.</p>

<p><strong><em>Setup event</em></strong>  Add <code class="language-plaintext highlighter-rouge">mongodb::10gen_repo</code> and
<code class="language-plaintext highlighter-rouge">mongodb::default</code>.  The former configures the service to use the
10Gen MongoDB builds.  The latter installs MongoDB and does a basic
single node configuration.</p>

<p><strong><em>Configure event</em></strong>  Add <code class="language-plaintext highlighter-rouge">mongodb::replicaset</code>.  This event
configures the MongoDB instance as a member of a replicaset.</p>

<p><img src="/images/blog/opsworks-configure-layer-mongodb.png" /></p>

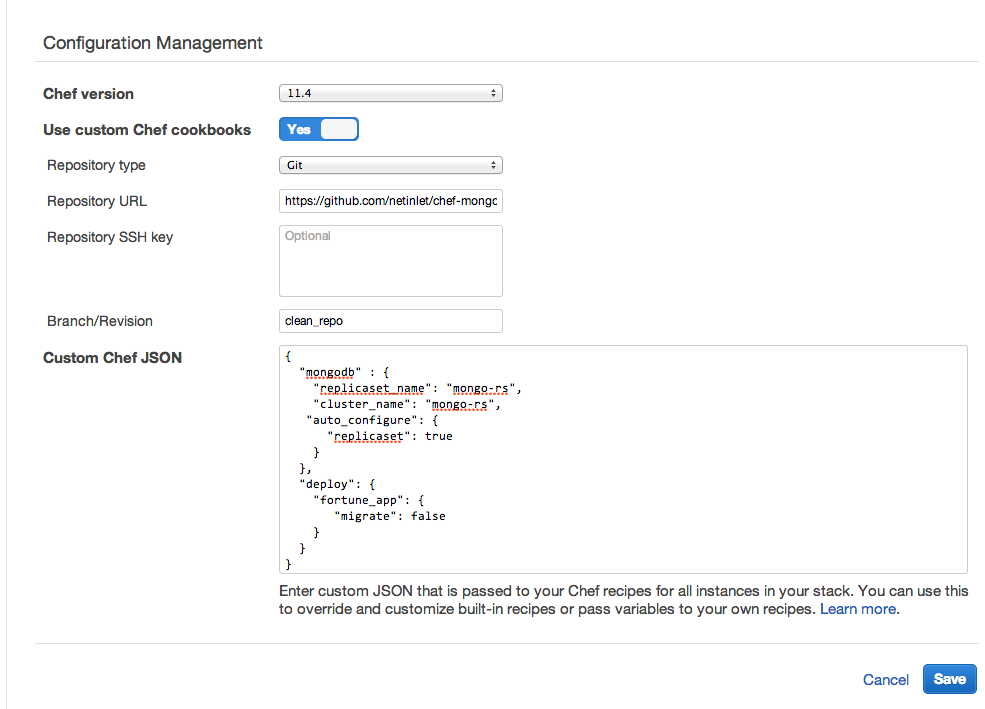
<p><strong><em>Custom Chef JSON</em></strong> In order for the replicaset to be configured properly, we have to specify the
name of the replicaset, cluster and tell the instance to
auto-configure.</p>

<p>The <code class="language-plaintext highlighter-rouge">replicaset_name</code> and <code class="language-plaintext highlighter-rouge">cluster_name</code> must match. You must also
set the <code class="language-plaintext highlighter-rouge">auto_configure:replicaset</code> hash value to <code class="language-plaintext highlighter-rouge">true</code> so the
replicaset is auto-configured on boot.</p>

<figure class="highlight"><pre><code class="language-json" data-lang="json"><span class="p">{</span><span class="w">
  </span><span class="nl">"mongodb"</span><span class="w"> </span><span class="p">:</span><span class="w"> </span><span class="p">{</span><span class="w">
    </span><span class="nl">"replicaset_name"</span><span class="p">:</span><span class="w"> </span><span class="s2">"mongo-rs"</span><span class="p">,</span><span class="w">
      </span><span class="nl">"cluster_name"</span><span class="p">:</span><span class="w"> </span><span class="s2">"mongo-rs"</span><span class="p">,</span><span class="w">
      </span><span class="nl">"auto_configure"</span><span class="p">:</span><span class="w"> </span><span class="p">{</span><span class="w">
        </span><span class="nl">"replicaset"</span><span class="p">:</span><span class="w"> </span><span class="kc">true</span><span class="w">
      </span><span class="p">}</span><span class="w">
  </span><span class="p">}</span><span class="w">
</span><span class="p">}</span></code></pre></figure>

<p><em>Screenshot of editing the Stack where the custom recipe and Chef JSON
are configured</em></p>

<p><img src="/images/blog/mongo-custom-cookbook-chef-json.png" /></p>

<h3 id="boot-your-mongodb-instances">Boot your MongoDB Instances</h3>

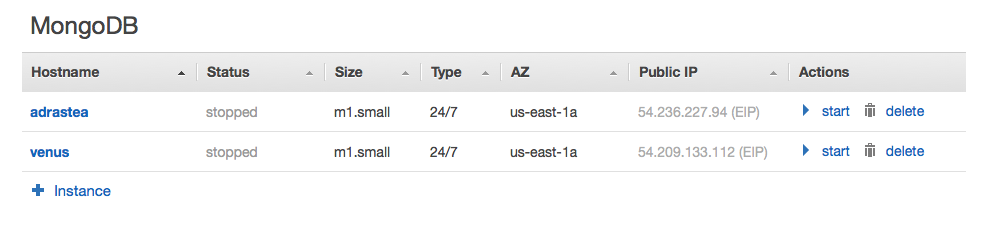
<p>Add some instances to the MongoDB layer and boot them. An odd number of
instances (3 or more) is the <a href="http://docs.mongodb.org/manual/replication/">proper way to configure a replicaset</a> without an arbiter.</p>

<p><img src="/images/blog/opsworks-boot-mongodb.png" /></p>

<p>Unfortunately, on first boot the primary replicaset member is unable to
communicate with the secondary replicaset member.  I was unable to
determine exactly why this happens but suspect a timing issue with the
availability of the secondary replicaset member.</p>

<p>This is evident in the logs of the second instance. This error indicates
the node was unreachable at the time it was being configured. See line 4.</p>

<div class="language-plaintext highlighter-rouge"><div class="highlight"><pre class="highlight"><code>[2014-01-12T23:15:37+00:00] INFO: ruby_block[run_config_replicaset] sending create action to ruby_block[config_replicaset] (delayed)
[2014-01-12T23:15:37+00:00] INFO: Processing ruby_block[config_replicaset] action create (mongodb::replicaset line 178)
[2014-01-12T23:15:42+00:00] INFO: Configuring replicaset with members adrastea, venus
[2014-01-12T23:15:42+00:00] ERROR: configuring replicaset returned: #&lt;BSON::OrderedHash:0x3fa7491cb9f4 {"errmsg"=&gt;"exception: need most members up to reconfigure, not ok : ip-172-31-0-241.ec2.internal:27017", "code"=&gt;13144, "ok"=&gt;0.0}&gt;
[2014-01-12T23:15:42+00:00] INFO: ruby_block[config_replicaset] called
</code></pre></div></div>

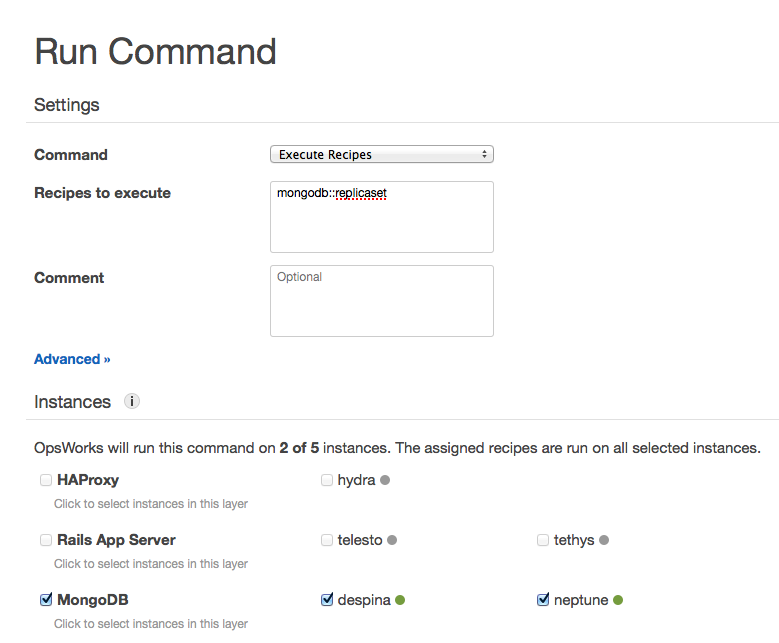
<p>The work-around is to run the <code class="language-plaintext highlighter-rouge">mongodb::replicaset</code> recipe again
from the Stack section of OpsWorks with the <code class="language-plaintext highlighter-rouge">Run Command</code> button.</p>

<p><img src="/images/blog/opsworks-run-cmd.png" /></p>

<p>*Note: MongoDB instance names changed because I removed the nodes before
realizing the original screenshot did not get saved properly.</p>

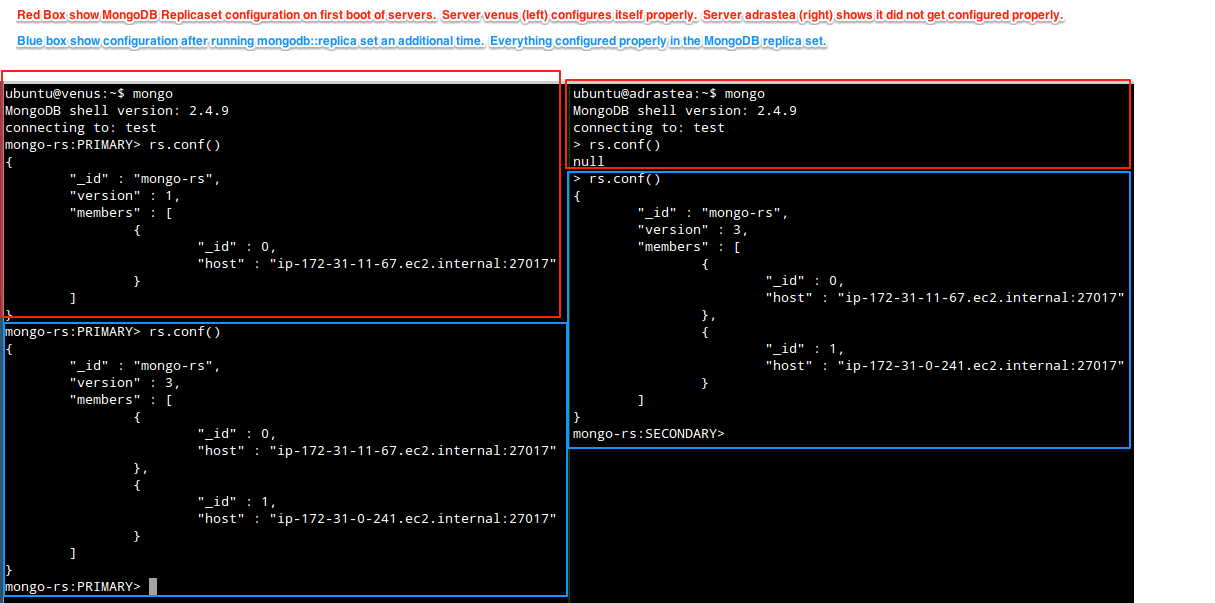
<h3 id="verifying-the-configuration">Verifying the configuration</h3>

<p>If everything was successful, you should be able to ssh to your MongoDB
instances and look at the MongoDB configuration with the commands
<code class="language-plaintext highlighter-rouge">mongo</code> to connect to the instance and <code class="language-plaintext highlighter-rouge">rs.conf()</code> to show the
current replicaset configuration.</p>

<p>This screenshot shows the before and after of the above mentioned
<code class="language-plaintext highlighter-rouge">mongodb::replicaset</code> command work-around.</p>

<p><img src="/images/blog/mongo-replicaset-config.png" /></p>]]></content><author><name>Doug Bryant</name><email>doug@netinlet.com</email></author><summary type="html"><![CDATA[I was recently tasked with setting up a MongoDB Replicaset. Documentation for setting up a MongoDB Replicaset with OpsWorks was a bit on the sparse side and took a bit of trial and error. I ended up with this solution.]]></summary></entry><entry><title type="html">Fun with Ruby Hashes - Initializing with a block</title><link href="/2014/01/01/fun-with-ruby-hashes.html" rel="alternate" type="text/html" title="Fun with Ruby Hashes - Initializing with a block" /><published>2014-01-01T16:45:14+00:00</published><updated>2014-01-01T16:45:14+00:00</updated><id>/2014/01/01/fun-with-ruby-hashes</id><content type="html" xml:base="/2014/01/01/fun-with-ruby-hashes.html"><![CDATA[<p>The alternate title for this post was <em>Poor man’s email load balancer</em>.</p>

<p>A less common method for creating and using Ruby hashes is to initialize the hash with a block. This allows you to return and/or assign a value for a missing key.  You can think of this as a parallel to using <code class="language-plaintext highlighter-rouge">method_missing</code> in Ruby classes and modules.</p>

<p>The <a href="http://www.ruby-doc.org/core-2.1.0/Hash.html#method-c-new" title="Ruby 2.1 Hash.new Documentation">documentation</a> for <strong>Hash.new</strong> with a block suggests</p>
<blockquote>
  <p>If a block is specified, it will be called with the hash object and the key, and should return the default value. It is the block’s responsibility to store the value in the hash if required.</p>
</blockquote>

<p>Most often for the case where I wanted a default value returned, I would use <code class="language-plaintext highlighter-rouge">fetch</code> and set the default value for individual keys being looked for.</p>
<div class="language-ruby highlighter-rouge"><div class="highlight"><pre class="highlight"><code><span class="n">my_hash</span> <span class="o">=</span> <span class="p">{}</span>
<span class="n">my_hash</span><span class="p">.</span><span class="nf">fetch</span><span class="p">(</span><span class="ss">:foo</span><span class="p">,</span> <span class="s2">"Not Set"</span><span class="p">)</span>
<span class="o">=&gt;</span> <span class="s2">"Not Set"</span>

<span class="n">my_hash</span><span class="p">[</span><span class="ss">:foo</span><span class="p">]</span> <span class="o">=</span> <span class="s1">'bar'</span>
<span class="n">my_hash</span><span class="p">.</span><span class="nf">fetch</span><span class="p">(</span><span class="ss">:foo</span><span class="p">,</span> <span class="s2">"Not Set"</span><span class="p">)</span>
<span class="o">=&gt;</span> <span class="s2">"bar"</span>
</code></pre></div></div>

<p>The same result can be achieved by initializing the hash with a block - any unknown keys requested from the hash will be initialized with a default value.</p>

<div class="language-ruby highlighter-rouge"><div class="highlight"><pre class="highlight"><code><span class="n">my_hash</span> <span class="o">=</span> <span class="no">Hash</span><span class="p">.</span><span class="nf">new</span><span class="p">{</span><span class="o">|</span><span class="nb">hash</span><span class="p">,</span><span class="n">key</span><span class="o">|</span> <span class="nb">hash</span><span class="p">[</span><span class="n">key</span><span class="p">]</span> <span class="o">=</span> <span class="s2">"Not Set"</span><span class="p">}</span>
<span class="n">my_hash</span><span class="p">[</span><span class="ss">:foo</span><span class="p">]</span>
<span class="o">=&gt;</span> <span class="s2">"Not Set"</span>

<span class="n">my_hash</span><span class="p">[</span><span class="ss">:foo</span><span class="p">]</span> <span class="o">=</span> <span class="s2">"bar"</span>
<span class="o">=&gt;</span> <span class="s2">"bar"</span>
</code></pre></div></div>

<p>An alternative to initializing <strong>Hash</strong> with a block is to set the <code class="language-plaintext highlighter-rouge">default_proc=</code> on an existing hash.</p>

<div class="language-ruby highlighter-rouge"><div class="highlight"><pre class="highlight"><code><span class="n">my_hash</span> <span class="o">=</span> <span class="p">{}</span>
<span class="n">my_hash</span><span class="p">[</span><span class="ss">:foo</span><span class="p">]</span>
<span class="o">=&gt;</span> <span class="kp">nil</span>

<span class="n">my_proc</span> <span class="o">=</span> <span class="nb">proc</span><span class="p">{</span><span class="o">|</span><span class="nb">hash</span><span class="p">,</span><span class="n">key</span><span class="o">|</span> <span class="nb">hash</span><span class="p">[</span><span class="n">key</span><span class="p">]</span> <span class="o">=</span> <span class="s2">"Not Set"</span><span class="p">}</span>
<span class="n">my_hash</span><span class="p">.</span><span class="nf">default_proc</span> <span class="o">=</span> <span class="n">my_proc</span>
<span class="n">my_hash</span><span class="p">[</span><span class="ss">:foo</span><span class="p">]</span>
<span class="o">=&gt;</span> <span class="s2">"Not Set"</span>
</code></pre></div></div>

<p>So now we have a way of always returning a default value for a hash.  Not very interesting in and of itself. What else could we do with our block backed hash?</p>

<!-- more -->

<p>##A simple loadbalancer…</p>

<p>This is one of my favorite hacks.  At MileMeter, we were using our Google Apps account to send email (reminders, confirmation emails, etc). At the time (not sure what the limit is now) we were limited to 500 emails per day from a single account.  At some point, we started bumping up against the 500 email per day limit.</p>

<p>It was easy enough to create another email account to send emails through, but ActionMailer only provided a single configuration and we didn’t want to upgrade Google Apps for all MileMeter users because of a single account limitation.</p>

<p><a href="http://rineysoft.com">John Riney</a> and I looked at our options went in search of a solution which would allows us to send more emails without spending any additional money.</p>

<p>John found the <strong>Hash</strong> documentation and realized we had a solution in what he deemed <a href="http://rineysoft.com/blog/2010/01/untrustworthy-hashes-in-ruby/">“Untrustworty Ruby Hashes”</a></p>

<p>It was easy enough to create additional emails accounts.  Armed with a <strong>Hash</strong> initialized with a block, we can now tell ActionMailer to pick a random <code class="language-plaintext highlighter-rouge">user_name</code> from a list of accounts each time it sent an email, thus effectively load-balancing our email.</p>

<p>A typical ActionMailer configuration is</p>
<div class="language-ruby highlighter-rouge"><div class="highlight"><pre class="highlight"><code><span class="n">config</span><span class="p">.</span><span class="nf">action_mailer</span><span class="p">.</span><span class="nf">delivery_method</span> <span class="o">=</span> <span class="ss">:smtp</span>
<span class="n">config</span><span class="p">.</span><span class="nf">action_mailer</span><span class="p">.</span><span class="nf">smtp_settings</span> <span class="o">=</span> <span class="p">{</span>
  <span class="ss">address:              </span><span class="s1">'smtp.gmail.com'</span><span class="p">,</span>
  <span class="ss">port:                 </span><span class="mi">587</span><span class="p">,</span>
  <span class="ss">domain:               </span><span class="s1">'example.com'</span><span class="p">,</span>
  <span class="ss">user_name:            </span><span class="s1">'&lt;username&gt;'</span><span class="p">,</span>
  <span class="ss">password:             </span><span class="s1">'&lt;password&gt;'</span><span class="p">,</span>
  <span class="ss">authentication:       </span><span class="s1">'plain'</span><span class="p">,</span>
  <span class="ss">enable_starttls_auto: </span><span class="kp">true</span>
<span class="p">}</span>
</code></pre></div></div>

<p>Our new load-balanced ActionMailer config is initialize with a block and configured to return a different <code class="language-plaintext highlighter-rouge">user_name</code> each time the <code class="language-plaintext highlighter-rouge">user_name</code> key is accessed.</p>

<div class="language-ruby highlighter-rouge"><div class="highlight"><pre class="highlight"><code><span class="c1"># list of email accounts to send from</span>
<span class="no">ACCOUNTS</span> <span class="o">=</span> <span class="sx">%w{system1 system2 system3 system4}</span><span class="p">.</span><span class="nf">map</span><span class="p">{</span><span class="o">|</span><span class="nb">name</span><span class="o">|</span> <span class="s2">"</span><span class="si">#{</span><span class="nb">name</span><span class="si">}</span><span class="s2">@example.com"</span><span class="p">}</span>
<span class="c1"># =&gt; ["system1@example.com", "system2@example.com", "system3@example.com", "system4@example.com"]</span>

<span class="c1"># NOTE: user_name key not set</span>
<span class="n">email_config</span> <span class="o">=</span> <span class="p">{</span>
  <span class="ss">address:              </span><span class="s1">'smtp.gmail.com'</span><span class="p">,</span>
  <span class="ss">port:                 </span><span class="mi">587</span><span class="p">,</span>
  <span class="ss">domain:               </span><span class="s1">'example.com'</span><span class="p">,</span>
  <span class="ss">password:             </span><span class="s1">'&lt;password&gt;'</span><span class="p">,</span>
  <span class="ss">authentication:       </span><span class="s1">'plain'</span><span class="p">,</span>
  <span class="ss">enable_starttls_auto: </span><span class="kp">true</span>
<span class="p">}</span>

<span class="n">config</span><span class="p">.</span><span class="nf">action_mailer</span><span class="p">.</span><span class="nf">delivery_method</span> <span class="o">=</span> <span class="ss">:smtp</span>
<span class="n">config</span><span class="p">.</span><span class="nf">action_mailer</span><span class="p">.</span><span class="nf">smtp_settings</span> <span class="o">=</span> <span class="no">Hash</span><span class="p">.</span><span class="nf">new</span> <span class="k">do</span> <span class="o">|</span><span class="nb">hash</span><span class="p">,</span><span class="n">key</span><span class="o">|</span>
  <span class="no">ACCOUNTS</span><span class="p">[</span><span class="nb">rand</span><span class="p">(</span><span class="no">ACCOUNTS</span><span class="p">.</span><span class="nf">size</span><span class="p">)]</span> <span class="k">if</span> <span class="ss">:user_name</span> <span class="o">==</span> <span class="n">key</span>
<span class="k">end</span><span class="p">.</span><span class="nf">merge!</span><span class="p">(</span><span class="n">email_config</span><span class="p">)</span>
</code></pre></div></div>

<p>Assuming the password is set the same for all accounts you want to use, when an email is sent, the user_name for the account is looked up and set to a different value every time, effectively a simple load-balancing technique.</p>

<div class="language-plaintext highlighter-rouge"><div class="highlight"><pre class="highlight"><code>irb(main):037:0&gt; smtp_settings[:user_name]
=&gt; "system1@example.com"
irb(main):038:0&gt; smtp_settings[:user_name]
=&gt; "system4@example.com"
irb(main):039:0&gt; smtp_settings[:user_name]
=&gt; "system2@example.com"
irb(main):040:0&gt; smtp_settings[:user_name]
=&gt; "system2@example.com"
irb(main):041:0&gt; smtp_settings[:user_name]
=&gt; "system3@example.com"
irb(main):042:0&gt; smtp_settings[:user_name]
=&gt; "system1@example.com"
irb(main):043:0&gt; smtp_settings[:user_name]
=&gt; "system3@example.com"
irb(main):044:0&gt; smtp_settings[:user_name]
=&gt; "system1@example.com"
irb(main):045:0&gt; smtp_settings[:user_name]
=&gt; "system3@example.com"
</code></pre></div></div>]]></content><author><name>Doug Bryant</name><email>doug@netinlet.com</email></author><summary type="html"><![CDATA[The alternate title for this post was Poor man’s email load balancer. A less common method for creating and using Ruby hashes is to initialize the hash with a block. This allows you to return and/or assign a value for a missing key. You can think of this as a parallel to using method_missing in Ruby classes and modules. The documentation for Hash.new with a block suggests If a block is specified, it will be called with the hash object and the key, and should return the default value. It is the block’s responsibility to store the value in the hash if required. Most often for the case where I wanted a default value returned, I would use fetch and set the default value for individual keys being looked for. my_hash = {} my_hash.fetch(:foo, "Not Set") =&gt; "Not Set" my_hash[:foo] = 'bar' my_hash.fetch(:foo, "Not Set") =&gt; "bar" The same result can be achieved by initializing the hash with a block - any unknown keys requested from the hash will be initialized with a default value. my_hash = Hash.new{|hash,key| hash[key] = "Not Set"} my_hash[:foo] =&gt; "Not Set" my_hash[:foo] = "bar" =&gt; "bar" An alternative to initializing Hash with a block is to set the default_proc= on an existing hash. my_hash = {} my_hash[:foo] =&gt; nil my_proc = proc{|hash,key| hash[key] = "Not Set"} my_hash.default_proc = my_proc my_hash[:foo] =&gt; "Not Set" So now we have a way of always returning a default value for a hash. Not very interesting in and of itself. What else could we do with our block backed hash?]]></summary></entry><entry><title type="html">Moving from Subversion to Git</title><link href="/2009/05/20/moving-from-subversion-to-git.html" rel="alternate" type="text/html" title="Moving from Subversion to Git" /><published>2009-05-20T20:03:12+00:00</published><updated>2009-05-20T20:03:12+00:00</updated><id>/2009/05/20/moving-from-subversion-to-git</id><content type="html" xml:base="/2009/05/20/moving-from-subversion-to-git.html"><![CDATA[<div>
<p>
I just finished moving all our repositories from subversion to git.  There is lots of documentation on the web, but none of it ties everything together.  Specifically, once you get your subversion repository including all branches and tags imported into a local copy of git, how do you push your git repository including all branches and tags to a remote git server?   This was important to us because we have ongoing work in some branches which are not ready to be pushed to trunk yet.
</p>
<p>
I started out by following the excellent instructions at <a href="http://scie.nti.st/2007/11/14/hosting-git-repositories-the-easy-and-secure-way">http://scie.nti.st/2007/11/14/hosting-git-repositories-the-easy-and-secure-way </a> to setup our own git repository.  Follow these instructions and create a simple git repository with only a couple of files to make sure it works and become familiar with it.  At this point, you have a working central git repository but you are not yet ready to import your subversion repository.  If using <a href="http://github.com">github</a>, you can skip this step.
</p>
<p>
	Next, go grab <a href="http://github.com/jcoglan/svn2git/tree/master">git2svn</a> from github.  This will download an entire subversion project, including branches and tags, into a local git repository.  Depending on the size of your codebase and number of branches/tags, etc, this may take a while.  Our smaller projects took about 10 minutes.  Our larger project took almost an hour.  It differs from git-svn in that it converts anything in subversion tags to actual git tags.
</p>
<p>
	Now for the magic of pushing your local git repository imported from subversion to the central git repository your team will use.   At this point, you should have a working central/remote git repository you are going to use.
</p>
<p>Inside the root of your local git project, run these commands, replacing everything which is in caps.

<code>git remote add origin git@YOUR_SERVER_HOSTNAME:YOUR_PROJECT_NAME.git
git push origin master:refs/heads/master
</code>
</p>
<p>
After this runs, you have only pushed the trunk to the remote repository (now called master).  You will also want to push all your tags and branches.  With git, you have to explicitly push your tags.
</p>

<code>git push --tags</code>
<p>
And now for the branches.  This was the only piece I could not find on the interweb.  This is achieved by the command
</p>
<code>git push --all</code>
<p>
The <strong>--all</strong> command per the documentation specifies that all refs under $GIT_DIR/refs/heads/ be pushed rather than naming each ref to push.
</p>
<p>
That should be all there is to it. Our other developers were able to clone the newly minted git repository and start developing where they left off on their branch with the command:
</p>
<code>git clone git@YOUR_SERVER_HOSTNAME:YOUR_PROJECT_NAME.git
git checkout -b local_branch_name --track origin/remote_branch_name
</code></div>]]></content><author><name>Doug Bryant</name><email>doug@netinlet.com</email></author><summary type="html"><![CDATA[I just finished moving all our repositories from subversion to git.  There is lots of documentation on the web, but none of it ties everything together.  Specifically, once you get your subversion repository including all branches and tags imported into a local copy of git, how do you push your git repository including all branches and tags to a remote git server?   This was important to us because we have ongoing work in some branches which are not ready to be pushed to trunk yet. I started out by following the excellent instructions at http://scie.nti.st/2007/11/14/hosting-git-repositories-the-easy-and-secure-way to setup our own git repository.  Follow these instructions and create a simple git repository with only a couple of files to make sure it works and become familiar with it.  At this point, you have a working central git repository but you are not yet ready to import your subversion repository.  If using github, you can skip this step. Next, go grab git2svn from github.  This will download an entire subversion project, including branches and tags, into a local git repository.  Depending on the size of your codebase and number of branches/tags, etc, this may take a while.  Our smaller projects took about 10 minutes.  Our larger project took almost an hour.  It differs from git-svn in that it converts anything in subversion tags to actual git tags. Now for the magic of pushing your local git repository imported from subversion to the central git repository your team will use.   At this point, you should have a working central/remote git repository you are going to use. Inside the root of your local git project, run these commands, replacing everything which is in caps.]]></summary></entry><entry><title type="html">Getting git +svn branches to follow remote branch</title><link href="/2009/02/09/getting-git-svn-branches-to-follow-remote-branch.html" rel="alternate" type="text/html" title="Getting git +svn branches to follow remote branch" /><published>2009-02-09T13:44:00+00:00</published><updated>2009-02-09T13:44:00+00:00</updated><id>/2009/02/09/getting-git-svn-branches-to-follow-remote-branch</id><content type="html" xml:base="/2009/02/09/getting-git-svn-branches-to-follow-remote-branch.html"><![CDATA[<p><a href="http://andy.delcambre.com/2008/3/4/git-svn-workflow">Andy Delcambre</a> and <a href="http://www.robbyonrails.com/articles/2008/04/10/git-svn-is-a-gateway-drug">Robby Russell</a> both have excellent articles about getting up and running with git as an subversion client.</p>
<p>The one thing that had been getting me was the fact that the branch I created locally did not always stick to following the remote branch.  It would start out that way, but once I checked out the master branch again, it would not always and definitely not consistently point toward the remote branch once I re-checked out my branch.</p>
<p>I finally figured out that the local and remote branch must be named differently.   The character case matters!  So if I had a remote branch of <span class="caps">ITR</span>-<span class="caps">FOO</span> and a local branch of itr-foo, it would loose track of the remote branch.  The easy solution is to name the branches differently by using a &#8220;-&#8221; remotely and a &#8220;_&#8221; locally for names or just name the branches differently.  Now, I use <span class="caps">ITR</span>-<span class="caps">FOO</span> remotely and itr_foo locally, or shorten the local name to itr_promos if I am using <span class="caps">ITR</span>-<span class="caps">PROMOTIONS</span> remotely.</p>
<p>For merging  branching, using git is so much simpler, even if it is <a href="http://tech.hickorywind.org/articles/2008/06/10/larry-vs-the-git-rebase-merge-conflict">very retarded sometimes</a>.</p>]]></content><author><name>Doug Bryant</name><email>doug@netinlet.com</email></author><summary type="html"><![CDATA[Andy Delcambre and Robby Russell both have excellent articles about getting up and running with git as an subversion client. The one thing that had been getting me was the fact that the branch I created locally did not always stick to following the remote branch. It would start out that way, but once I checked out the master branch again, it would not always and definitely not consistently point toward the remote branch once I re-checked out my branch. I finally figured out that the local and remote branch must be named differently. The character case matters! So if I had a remote branch of ITR-FOO and a local branch of itr-foo, it would loose track of the remote branch. The easy solution is to name the branches differently by using a &#8220;-&#8221; remotely and a &#8220;_&#8221; locally for names or just name the branches differently. Now, I use ITR-FOO remotely and itr_foo locally, or shorten the local name to itr_promos if I am using ITR-PROMOTIONS remotely. For merging branching, using git is so much simpler, even if it is very retarded sometimes.]]></summary></entry><entry><title type="html">MileMeter has Launched</title><link href="/2008/10/11/milemeter-has-launched.html" rel="alternate" type="text/html" title="MileMeter has Launched" /><published>2008-10-11T11:52:00+00:00</published><updated>2008-10-11T11:52:00+00:00</updated><id>/2008/10/11/milemeter-has-launched</id><content type="html" xml:base="/2008/10/11/milemeter-has-launched.html"><![CDATA[<p>After a year of work, my company <a href="http://milemeter.com">MileMeter</a> has launched.  We sell auto insurance by the mile with no vehicle tracking devices involved.</p>
<p>A big hats off to Chris Gay for working so hard for so many years so that we can could get to this point. Insurance rules had to be changed and it was difficult for many people to see the benefit selling insurance this way.</p>
<p>We are also one of very few, if not the only insurance company powered entirely by <a href="http://ruby-lang.org">Ruby</a>  It certainly gave us an advantage as we were able to get a robust, well tested application out the door so quickly.</p>]]></content><author><name>Doug Bryant</name><email>doug@netinlet.com</email></author><summary type="html"><![CDATA[After a year of work, my company MileMeter has launched. We sell auto insurance by the mile with no vehicle tracking devices involved. A big hats off to Chris Gay for working so hard for so many years so that we can could get to this point. Insurance rules had to be changed and it was difficult for many people to see the benefit selling insurance this way. We are also one of very few, if not the only insurance company powered entirely by Ruby It certainly gave us an advantage as we were able to get a robust, well tested application out the door so quickly.]]></summary></entry><entry><title type="html">ruby-mysql-osx</title><link href="/2008/09/03/ruby-mysql-osx.html" rel="alternate" type="text/html" title="ruby-mysql-osx" /><published>2008-09-03T23:35:00+00:00</published><updated>2008-09-03T23:35:00+00:00</updated><id>/2008/09/03/ruby-mysql-osx</id><content type="html" xml:base="/2008/09/03/ruby-mysql-osx.html"><![CDATA[<p>I keep having to look this up…..
<code>sudo env ARCHFLAGS=“-arch i386” gem install mysql — —with-mysql-config=/usr/local/mysql/bin/mysql_config</code></p>]]></content><author><name>Doug Bryant</name><email>doug@netinlet.com</email></author><summary type="html"><![CDATA[I keep having to look this up….. sudo env ARCHFLAGS=“-arch i386” gem install mysql — —with-mysql-config=/usr/local/mysql/bin/mysql_config]]></summary></entry><entry><title type="html">Pradipta’s Rolodex</title><link href="/2008/07/18/pradiptas-rolodex.html" rel="alternate" type="text/html" title="Pradipta’s Rolodex" /><published>2008-07-18T17:24:00+00:00</published><updated>2008-07-18T17:24:00+00:00</updated><id>/2008/07/18/pradiptas-rolodex</id><content type="html" xml:base="/2008/07/18/pradiptas-rolodex.html"><![CDATA[<p>I woke up this morning to a 40+ thread of emails which originated by a recruiter sending 416 people job posting, all via TO:</p>
<p>It quickly turned into a somewhat fun conversation with lots of people and jokes.  Rather quickly a <a href="http://groups.google.com/">google group</a> named <a href="http://groups.google.com/group/pradiptas-rolodex?hl=en">Pradipta&#8217;s Rolodex</a> was created.  Also followed was a Wikipedia entry (quickly deleted by Wikipedia admins), a <a href="http://www.facebook.com/group.php?gid=43333321264">FaceBook group</a>, at least one <a href="http://the416.net">domain registration</a> as well as posts to <a href="http://digg.com/programming/recruiter_stupidly_CC_s_400_coders_and_one_replies_all">Digg</a>,  <a href="http://www.reddit.com/info/6scl4/comments/">Reddit</a> and <a href="http://groups.google.com/group/pradiptas-rolodex/web/links?hl=en">others</a>.</p>
<p>Oh, the friday fun&#8230;..</p>]]></content><author><name>Doug Bryant</name><email>doug@netinlet.com</email></author><summary type="html"><![CDATA[I woke up this morning to a 40+ thread of emails which originated by a recruiter sending 416 people job posting, all via TO: It quickly turned into a somewhat fun conversation with lots of people and jokes. Rather quickly a google group named Pradipta&#8217;s Rolodex was created. Also followed was a Wikipedia entry (quickly deleted by Wikipedia admins), a FaceBook group, at least one domain registration as well as posts to Digg, Reddit and others. Oh, the friday fun&#8230;..]]></summary></entry><entry><title type="html">Rspec Test render(:nothing = true)</title><link href="/2008/03/31/rspec-test-rendernothing-true.html" rel="alternate" type="text/html" title="Rspec Test render(:nothing = true)" /><published>2008-03-31T20:15:00+00:00</published><updated>2008-03-31T20:15:00+00:00</updated><id>/2008/03/31/rspec-test-rendernothing-true</id><content type="html" xml:base="/2008/03/31/rspec-test-rendernothing-true.html"><![CDATA[<p>I was trying to test one of my controllers was successfully hitting the render(:nothing = true) block.  I could not find anything specifically in the <span class="caps">API</span> which handled this senario, so I ended up using have_text with a space as an argument.</p>
<p>
<code>@response.should have_text(&quot; &quot;)</code>
</p>]]></content><author><name>Doug Bryant</name><email>doug@netinlet.com</email></author><summary type="html"><![CDATA[I was trying to test one of my controllers was successfully hitting the render(:nothing = true) block. I could not find anything specifically in the API which handled this senario, so I ended up using have_text with a space as an argument. @response.should have_text(&quot; &quot;)]]></summary></entry><entry><title type="html">Vote for Milemeter at AWS Startup Challenge</title><link href="/2007/12/01/vote-for-milemeter-at-aws-startup-challenge.html" rel="alternate" type="text/html" title="Vote for Milemeter at AWS Startup Challenge" /><published>2007-12-01T20:19:00+00:00</published><updated>2007-12-01T20:19:00+00:00</updated><id>/2007/12/01/vote-for-milemeter-at-aws-startup-challenge</id><content type="html" xml:base="/2007/12/01/vote-for-milemeter-at-aws-startup-challenge.html"><![CDATA[<p>Go vote for Milemeter at <span class="caps">AWS</span> Startup Challenge and keep me gainfully employed!</p>
<p>We are proud to be 1 of 7 Finalist for the Amazon.com <span class="caps">AWS</span> Startup Challenge and will give our presentation next week at Amazon.com HQ. <a href="http://milemeter.com">Milemeter</a> is an innovative insurance start-up that will offer &#8220;auto insurance buy the mile&#8221;.</p>
<p><a href="http://developer.amazonwebservices.com/connect/amazon_startupchallenge.jsp">Please Vote for Milemeter!</a></p>
<p><b>Update:</b> Congratulations to <a href="http://www.ooyala.com/">Ooyala</a> for winning the <span class="caps">AWS</span> Startup Challenge.</p>]]></content><author><name>Doug Bryant</name><email>doug@netinlet.com</email></author><summary type="html"><![CDATA[Go vote for Milemeter at AWS Startup Challenge and keep me gainfully employed! We are proud to be 1 of 7 Finalist for the Amazon.com AWS Startup Challenge and will give our presentation next week at Amazon.com HQ. Milemeter is an innovative insurance start-up that will offer &#8220;auto insurance buy the mile&#8221;. Please Vote for Milemeter! Update: Congratulations to Ooyala for winning the AWS Startup Challenge.]]></summary></entry><entry><title type="html">Testing private and protected methods with ruby</title><link href="/2007/04/18/testing-private-and-protected-methods-with-ruby.html" rel="alternate" type="text/html" title="Testing private and protected methods with ruby" /><published>2007-04-18T16:48:00+00:00</published><updated>2007-04-18T16:48:00+00:00</updated><id>/2007/04/18/testing-private-and-protected-methods-with-ruby</id><content type="html" xml:base="/2007/04/18/testing-private-and-protected-methods-with-ruby.html"><![CDATA[<p>When I have to test my protected and private methods in ruby, I make the methods public for the scope of the test.</p>
<p>
<code>  
  MyClass.send(:public, *MyClass.protected_instance_methods)  <br />
  MyClass.send(:public, *MyClass.private_instance_methods)<br />
</code>
</p>
<p>Just place this code in your testing class substituting your class name.  Include the namespace if applicable.</p>]]></content><author><name>Doug Bryant</name><email>doug@netinlet.com</email></author><summary type="html"><![CDATA[When I have to test my protected and private methods in ruby, I make the methods public for the scope of the test. MyClass.send(:public, *MyClass.protected_instance_methods) MyClass.send(:public, *MyClass.private_instance_methods) Just place this code in your testing class substituting your class name. Include the namespace if applicable.]]></summary></entry></feed>